Your Cart is Empty


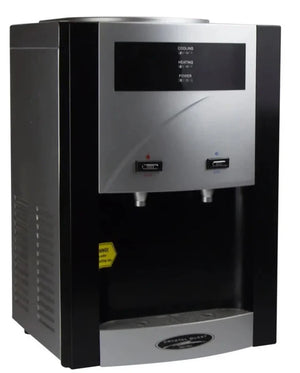
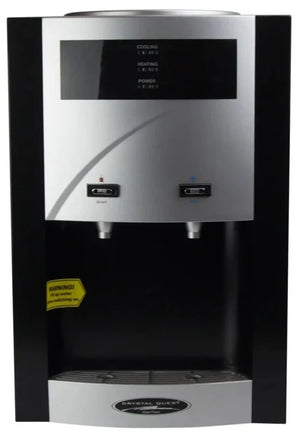
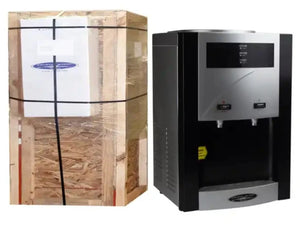
Crystal Quest TURBO Countertop Bottleless Water Cooler
$588.50 - $631.40$500.23 - $536.69
- ✓ Fast Free Shipping Within the US
- ✓ 120 Day No Hassle Returns
- ✓ No Sales Tax On All Orders (Outside of MN)
-

Crystal Quest TURBO Countertop Bottleless Water Cooler: Your Source for Pure, Hassle-Free Hydration
The Crystal Quest TURBO Countertop Bottleless Water Cooler is your ideal solution for fresh, clean water in both home and office settings. Its compact design fits perfectly on kitchen counters, break rooms, or conference rooms, offering a sleek and space-saving hydration option. Forget the hassle of heavy bottles and delivery schedules; this bottleless cooler connects directly to your water line, providing an uninterrupted supply of pure water.
Standing at just 18.5 inches tall, the Turbo Cooler fits seamlessly on most countertops without taking up too much space. Whether it's for your busy office or your spacious home kitchen, this cooler is designed for convenience and efficiency. Enjoy the comfort of always having clean water within reach, saving both time and money.
Incorporate this sleek and efficient water cooler into your daily routine and experience the benefits of advanced filtration technology. It's time to upgrade your hydration game and ditch the cumbersome water bottles.
Ready to ditch the heavy bottles and enjoy pure, clean water 24/7? The Crystal Quest TURBO Countertop Bottleless Water Cooler is your solution. Click "Add to Cart" now and experience the convenience of continuous, filtered water. Your kitchen or office break room will thank you!
Enjoy superior hydration with the Crystal Quest TURBO Countertop Bottleless Water Cooler Features
- Integrated Filtration System: Get pure, safe water with our built-in SMART Water Cooler (Turbo) Filter Cartridge.
- Separate Hot/Cold Power Switches: Easily toggle between hot and cold water with dedicated power buttons.
- Automatic Heating Shut-off: Ensures safe water temperatures with an automatic shut-off mechanism.
- Automatic Float Valve: Maintains a steady water flow with the built-in float valve.
- High-Efficiency Sealed Compressor Cooling System: Quickly chill your water with our efficient cooling system.
- Type 304 Stainless Steel Water Tanks: Durable, corrosion-resistant tanks for both hot and cold water.
- Large Reservoir and Temperature Control: A 3.2-gallon capacity and precise temperature controls keep your water just right.
- Optional Add-Ons: Enhance your cooler with features like the Ozonator Sterilizer System, UV Water Sterilizer System, and Leak Detector Smart Valve.
- User-Friendly and Easy to Clean: Designed for simple use and effortless cleaning, providing consistent, worry-free hydration.
5-Stage Filtration Process
With its advanced 5-Stage Filtration process, the Turbo Cooler ensures that you get the cleanest water possible. Here's how it works:
- Stage 1: The one-micron filter pad captures suspended particles like silt, sediment, cysts (Giardia, Cryptosporidium), sand, rust, and other undissolved materials.
- Stage 2: The Granulated Activated Carbon (GAC) cartridge removes 99.9% of chlorine, chemicals linked to cancer (THMs, benzene), pesticides, herbicides, insecticides, volatile organic compounds (VOCs), PCBs, MTBE, and hundreds of other contaminants that affect taste and odor.
- Stages 3 & 4: The ERA-6500 and ERA-9500 stages use a special high-purity alloy blend of copper and zinc (Eagle Redox Alloy®) to oxidize chlorine, iron, and hydrogen sulfide, and remove heavy metals such as lead, mercury, copper, nickel, chromium, cadmium, and aluminum through electrochemical processes.
- Stage 5: A final one-micron filtration pad further reduces undesirable particles, ensuring your water is as pure as possible.
Add to cart now and enjoy free and fast shipping
Crystal Quest TURBO Countertop Bottleless Water Cooler's FAQs
Q: What pressure range does my Water Cooler run in?
A: Each of our Water Cooler units is designed to run between 30 - 60 psi.
Q: Can I sit my cup or bottle on the Drip Tray when filling it?
A: Do not use the Drip Tray to support any type of container when filling from the unit.
Q: How can I remove the tubing from a Compression Fitting?
A: Compression Fittings are the style of fitting found on all of our Filter Cartridges, each one marked by a distinctive hexagon-shaped plastic cap. To remove the tubing: Unscrew the plastic cap by turning it counterclockwise, then remove both the cap and the tubing from the fitting. Be cautious not to over-tighten the cap when reinstalling the tubing to the fitting.
Q: How can I remove the tubing from a Quick Connect Fitting?
A: Quick Connect Fittings are the style of fitting found on most of the internal components of your unit, each one marked by a distinctive blue clasp directly below the lip of the fitting inlet. To remove the tubing: Locate the small blue clasp and remove it. Next, you will press down on the lip of the fitting with one hand while gently pulling the tubing out with the other. To replace the fitting: Press down on lip of the fitting, push the tubing firmly in, release the fitting lip, then reinstall the blue clasp.
ter filter tubing
Q: My Reverse Osmosis Membrane looks different from the other filters, how to I replace it?
A: The Reverse Osmosis Membrane is the only filter on the machine that needs to be removed from its housing when being replaced. Unscrew the Membrane cap from the housing, turning counterclockwise to loosen. Once the cap is off, remove the previous RO Membrane by lifting it from the housing with a pair of pliers by its exposed nozzle. Next install the new Membrane, making sure to insert it into the housing by the nozzle which has the two small o-rings, pictured below:
Q: Why doesn't my water cooler produce hot/cold water?
A: COOLING: The first thing you are going to want to do is check the back of the water cooler to see if both cooling element switch is turned to the "on" position. If it is, you will need to locate the thermostat screw at the top of the water cooler. It would be behind the yellow sticker at the top of the system labeled "Thermostat". Turn that screw counterclockwise (to the left) to lower the thermostat and allow the compressor to kick on. You may not hear the compressor kick on at first, but give the system at least 15 minutes before testing the cold-water spout. This should take care of the issue but if not, call us directly to speak to Technical Support.
HEATING: What you are going to want to do is make sure the heating element switch is turned to the "on" position in the back of the water cooler. If the switch is turned to the "on" position, locate the heating tank (towards the middle of the tank). There will be two sets of wires connected to the back of the tank. Look at the second set of wires (the bottom set). There will be a small black button between the set of wires which would be the heating tank reset switch. Press and hold that reset switch for 5 seconds and allow the tank 15 minutes to start the heating process before testing the hot water spout. This should take care of the issue but if not, call us directly to speak to Technical Support.
Q: I am experiencing a leak with my water cooler, why?
A: When experiencing a leak within your system, you want to figure out exactly where the leak is coming from. If this is a floor standing water cooler, open the front panel of the system to reveal the cartridges.Check each connection between the filters to make sure they are secure. If the connections or the cartridges are the problem, call us directly to speak to a technician. If your connections and cartridges are not the cause for the leak, remove the hat (top) of the water cooler to expose the reservoir tank. You can access the top of the reservoir tank by removing the screws at the back of the water cooler towards the top.
After you have taken off the hat of the water cooler, remove the transparent plastic lid on top of the reservoir tank. If the tank is full and you still hear the pump trying to produce water, call in directly to speak to a technician to help solve the issue for you. These are the primary areas that would cause the system to leak, however, if you have checked both areas and cannot identify where the leak is originating from, call us to speak to a technician.
Q: Why aren't the element lights on?
A: If your water cooler element (Heating/Cooling) lights are not on, check the back of the water cooler to make sure the element switches are turned to the "on" position. If they are turned to the "on" position and still not allowing the element lights to come on, check the power source to make sure the water cooler is plugged in. IF the water cooler is plugged in and still not lighting up, call us directly to speak to a technician as you may need to replace the fuse.Specifications
Specifications
Weight 37 lbs. Dimensions (D) 13” x (W) 13” x (H) 18.5” Total reservoir capacity 3.2 gallons Hot water tank temperature 176-196°F Heating power 500W Cooling power 112W Hot water tank volume 0.5 gal/heating Cold water tank volume 1 gal per hour Cooling capacity 1.95 gal per hour Voltage 10V-120V 50/60Hz
Replacement Cartridges
Product Name SKU SMART Water Cooler (Turbo) Filter Cartridge CQE-RC-04057
Installation Instructions:
Ensure the safety and effectiveness of your Crystal Quest TURBO Countertop Bottleless Water Cooler by getting your hands on the essential installation manual and safety reminders today. Don’t miss out on maximizing your device’s efficiency—download your free copy now and step into a world of pure, clean water at your convenience.
Product Manual Product Brochure Water Cooler Manual WaterCoolors-TURBO -
Proud to Offer Fast Free Shipping:
- Average Delivery Window is 2 - 5 Days From Purchase
- Tracking Information is Provided to Email on File Within 48 Hours of Purchase
- Larger Whole Home Filtration Systems & Water Coolers Require Freight Shipping & Have Longer Processing/Delivery Windows
-
Five Year Industry-Leading Warranty Coverage
Aqua Home Supply ("we," "our," or "us") warrants to the original purchaser ("you" or "your") of the product ("Product") that the Product is free from defects in material and workmanship under normal use and service for a period of five (5) years from the date of purchase. This warranty is non-transferable and extends only to the original purchaser.
What is Covered
This five-year limited warranty covers manufacturing defects in materials and workmanship. Aqua Home Supply will, at its discretion, either repair or replace any Product found to be defective under normal use during the warranty period. The repaired or replacement Product will be covered for the remaining duration of the original warranty.
What is Not Covered
This warranty does not cover:
- Damage resulting from misuse, abuse, negligence, accidents, or improper handling or installation.
- Damage caused by unauthorized repairs or modifications.
- Normal wear and tear, including cosmetic damage, scratches, dents, or blemishes.
- Consumable parts, such as batteries or accessories, unless otherwise stated.
- Products with removed or altered serial numbers.
- Products purchased from unauthorized sellers.
Obtaining Warranty Service
If you believe that your Product is covered by this warranty, please contact our customer support team at info@aquahomesupply.com or visit our website at www.aquahomesupply.com for instructions on how to obtain warranty service. You may be required to provide proof of purchase, such as a dated sales receipt.
Limitation of Liability
TO THE EXTENT PERMITTED BY APPLICABLE LAW, AQUA HOME SUPPLY SHALL NOT BE LIABLE FOR ANY INCIDENTAL, CONSEQUENTIAL, INDIRECT, OR SPECIAL DAMAGES, INCLUDING, BUT NOT LIMITED TO, LOSS OF PROFITS, LOSS OF DATA, LOSS OF USE OF THE PRODUCT, OR ANY ASSOCIATED EQUIPMENT OR PROPERTY, COST OF CAPITAL, COST OF SUBSTITUTE OR REPLACEMENT EQUIPMENT, FACILITIES, DOWNTIME, CLAIMS OF THIRD PARTIES, AND INJURY TO PROPERTY. TO THE EXTENT PERMITTED BY APPLICABLE LAW, AQUA HOME SUPPLY'S LIABILITY SHALL BE LIMITED TO THE PURCHASE PRICE PAID FOR THE PRODUCT.
Important Notice
Please retain your proof of purchase, such as a sales receipt or invoice, for warranty claims.
This five-year limited warranty statement constitutes the entire warranty for the Product and supersedes all other warranties and representations, whether oral or written. No other warranties, whether expressed or implied, including but not limited to any implied warranties of merchantability or fitness for a particular purpose, apply to this Product.
Aqua Home Supply


Crystal Quest TURBO Countertop Bottleless Water Cooler: Your Source for Pure, Hassle-Free Hydration
The Crystal Quest TURBO Countertop Bottleless Water Cooler is your ideal solution for fresh, clean water in both home and office settings. Its compact design fits perfectly on kitchen counters, break rooms, or conference rooms, offering a sleek and space-saving hydration option. Forget the hassle of heavy bottles and delivery schedules; this bottleless cooler connects directly to your water line, providing an uninterrupted supply of pure water.
Standing at just 18.5 inches tall, the Turbo Cooler fits seamlessly on most countertops without taking up too much space. Whether it's for your busy office or your spacious home kitchen, this cooler is designed for convenience and efficiency. Enjoy the comfort of always having clean water within reach, saving both time and money.
Incorporate this sleek and efficient water cooler into your daily routine and experience the benefits of advanced filtration technology. It's time to upgrade your hydration game and ditch the cumbersome water bottles.
Ready to ditch the heavy bottles and enjoy pure, clean water 24/7? The Crystal Quest TURBO Countertop Bottleless Water Cooler is your solution. Click "Add to Cart" now and experience the convenience of continuous, filtered water. Your kitchen or office break room will thank you!
Enjoy superior hydration with the Crystal Quest TURBO Countertop Bottleless Water Cooler Features
- Integrated Filtration System: Get pure, safe water with our built-in SMART Water Cooler (Turbo) Filter Cartridge.
- Separate Hot/Cold Power Switches: Easily toggle between hot and cold water with dedicated power buttons.
- Automatic Heating Shut-off: Ensures safe water temperatures with an automatic shut-off mechanism.
- Automatic Float Valve: Maintains a steady water flow with the built-in float valve.
- High-Efficiency Sealed Compressor Cooling System: Quickly chill your water with our efficient cooling system.
- Type 304 Stainless Steel Water Tanks: Durable, corrosion-resistant tanks for both hot and cold water.
- Large Reservoir and Temperature Control: A 3.2-gallon capacity and precise temperature controls keep your water just right.
- Optional Add-Ons: Enhance your cooler with features like the Ozonator Sterilizer System, UV Water Sterilizer System, and Leak Detector Smart Valve.
- User-Friendly and Easy to Clean: Designed for simple use and effortless cleaning, providing consistent, worry-free hydration.
5-Stage Filtration Process
With its advanced 5-Stage Filtration process, the Turbo Cooler ensures that you get the cleanest water possible. Here's how it works:
- Stage 1: The one-micron filter pad captures suspended particles like silt, sediment, cysts (Giardia, Cryptosporidium), sand, rust, and other undissolved materials.
- Stage 2: The Granulated Activated Carbon (GAC) cartridge removes 99.9% of chlorine, chemicals linked to cancer (THMs, benzene), pesticides, herbicides, insecticides, volatile organic compounds (VOCs), PCBs, MTBE, and hundreds of other contaminants that affect taste and odor.
- Stages 3 & 4: The ERA-6500 and ERA-9500 stages use a special high-purity alloy blend of copper and zinc (Eagle Redox Alloy®) to oxidize chlorine, iron, and hydrogen sulfide, and remove heavy metals such as lead, mercury, copper, nickel, chromium, cadmium, and aluminum through electrochemical processes.
- Stage 5: A final one-micron filtration pad further reduces undesirable particles, ensuring your water is as pure as possible.
Add to cart now and enjoy free and fast shipping
Crystal Quest TURBO Countertop Bottleless Water Cooler's FAQs
Q: What pressure range does my Water Cooler run in?
A: Each of our Water Cooler units is designed to run between 30 - 60 psi.
Q: Can I sit my cup or bottle on the Drip Tray when filling it?
A: Do not use the Drip Tray to support any type of container when filling from the unit.
Q: How can I remove the tubing from a Compression Fitting?
A: Compression Fittings are the style of fitting found on all of our Filter Cartridges, each one marked by a distinctive hexagon-shaped plastic cap. To remove the tubing: Unscrew the plastic cap by turning it counterclockwise, then remove both the cap and the tubing from the fitting. Be cautious not to over-tighten the cap when reinstalling the tubing to the fitting.
Q: How can I remove the tubing from a Quick Connect Fitting?
A: Quick Connect Fittings are the style of fitting found on most of the internal components of your unit, each one marked by a distinctive blue clasp directly below the lip of the fitting inlet. To remove the tubing: Locate the small blue clasp and remove it. Next, you will press down on the lip of the fitting with one hand while gently pulling the tubing out with the other. To replace the fitting: Press down on lip of the fitting, push the tubing firmly in, release the fitting lip, then reinstall the blue clasp.
ter filter tubing
Q: My Reverse Osmosis Membrane looks different from the other filters, how to I replace it?
A: The Reverse Osmosis Membrane is the only filter on the machine that needs to be removed from its housing when being replaced. Unscrew the Membrane cap from the housing, turning counterclockwise to loosen. Once the cap is off, remove the previous RO Membrane by lifting it from the housing with a pair of pliers by its exposed nozzle. Next install the new Membrane, making sure to insert it into the housing by the nozzle which has the two small o-rings, pictured below:

Q: Why doesn't my water cooler produce hot/cold water?
A: COOLING: The first thing you are going to want to do is check the back of the water cooler to see if both cooling element switch is turned to the "on" position. If it is, you will need to locate the thermostat screw at the top of the water cooler. It would be behind the yellow sticker at the top of the system labeled "Thermostat". Turn that screw counterclockwise (to the left) to lower the thermostat and allow the compressor to kick on. You may not hear the compressor kick on at first, but give the system at least 15 minutes before testing the cold-water spout. This should take care of the issue but if not, call us directly to speak to Technical Support.
HEATING: What you are going to want to do is make sure the heating element switch is turned to the "on" position in the back of the water cooler. If the switch is turned to the "on" position, locate the heating tank (towards the middle of the tank). There will be two sets of wires connected to the back of the tank. Look at the second set of wires (the bottom set). There will be a small black button between the set of wires which would be the heating tank reset switch. Press and hold that reset switch for 5 seconds and allow the tank 15 minutes to start the heating process before testing the hot water spout. This should take care of the issue but if not, call us directly to speak to Technical Support.
Q: I am experiencing a leak with my water cooler, why?
A: When experiencing a leak within your system, you want to figure out exactly where the leak is coming from. If this is a floor standing water cooler, open the front panel of the system to reveal the cartridges.
Check each connection between the filters to make sure they are secure. If the connections or the cartridges are the problem, call us directly to speak to a technician. If your connections and cartridges are not the cause for the leak, remove the hat (top) of the water cooler to expose the reservoir tank. You can access the top of the reservoir tank by removing the screws at the back of the water cooler towards the top.
After you have taken off the hat of the water cooler, remove the transparent plastic lid on top of the reservoir tank. If the tank is full and you still hear the pump trying to produce water, call in directly to speak to a technician to help solve the issue for you. These are the primary areas that would cause the system to leak, however, if you have checked both areas and cannot identify where the leak is originating from, call us to speak to a technician.
Q: Why aren't the element lights on?
A: If your water cooler element (Heating/Cooling) lights are not on, check the back of the water cooler to make sure the element switches are turned to the "on" position. If they are turned to the "on" position and still not allowing the element lights to come on, check the power source to make sure the water cooler is plugged in. IF the water cooler is plugged in and still not lighting up, call us directly to speak to a technician as you may need to replace the fuse.


